What is a stick float?
Any float that is attached to the mainline using float rubbers at the top and the bottom of the float (‘top and bottom’ fashion) designed for fishing rivers. In fact most anglers use one in the middle as well. As you can see from these pages, stick floats come in many shapes and sizes and can be made form a number of wood, wire, alloy or quill combinations to suit differing water conditions. Generally speaking, fishing with a top and bottom float is most effective no more than two rodlengths out.
How do you fish a stick float?
Normally a stick float is set up to fish just overdepth with the hook bait tripping along the bottom. However, on slower venues it can pay to fish between an inch and three inches above the deck if roach are the target. When allowed to run through at the speed of the current, the float travels in front of the hook bait. But by controlling the rate that the line comes off the reel, you slow the float down or hold the float back so that the hook bait wafts in front of the float and mimics the loosefeed. This is an especially deadly tactic when fishing a bait through a deep glide that starts to shallow up downstream.
When would you fish a stick float over a waggler?
Although a waggler can be fished effectively on moving water, it has to be fished at the pace of the river. Because it’s attached at the bottom of the float only, as soon as you start trying to slow the float down it will drag under. With a stick float the line is pinned along the float using float rubbers (silicone tubing). With the line coming off the top of the float, you have great control as long as you keep a tight line as the float moves downstream. This is called ‘keeping in touch’ with the float.
What advantage does slowing the bait down give you when float fishing?
The ability to slow the pace of the float down is a very important for the river angler. The water on the surface of a river travels much quicker than the water near the bottom, where you are fishing. By slowing the float down you can run the hook bait through the swim at the same pace as the loosefeed near the bottom. This kind of control can really only be achieved at short range or with a long rod at medium range.
What do the different styles of stick floats tips achieve?
Those with a domed top carry a lot of buoyancy in the top of the float and are useful if you are fishing slightly overdepth to bounce the bait along the bottom – the extra buoyancy helps prevent the float from being dragged under as the bait trips along. They also tend not to ride out of the water too much when held back. With a wider area of float at the top, they can also be seen for a good distance downstream. A slimmer, pointed top is more sensitive and good when bites are shy, and allows you to keep more of the tip showing so you can read bites, while the long, slim tip on the Crowquill Avon or Topper allows you to read bites really well in deeper water and works well with a bulked shotting pattern. Shouldered stick floats are useful when you need to hold the float back hard, as flow pushes the shoulder down in the water as you do so, so the float doesn’t ride out of the water too much. See bottom of this feature for more about stick float patterns.
How to I choose the right size of float?
This depends on how swift the current is, but for sensitivity you shouldn’t use a bigger float than you really need. For a river at normal level with a steady pace, a good rule of thumb would be for a 3ft to 4ft deep swim use a 4xNo4 float; for a 5ft to 8ft deep swim a 5xNo4 float and for a 9ft to12ft deep swim a 6 to 8xNo4 float. In really fast-flowing currents you need to use large-bodied floats, such as Crowquill Avons or Chubbers, that take a lot of bulk (4AAA-plus) to get the bait down to the deck fast, but we recommend you don’t fish swims deeper than 6ft, as casting beyond two rod-lengths can prove problematic with tangles. For swims over 12ft deep, stick float fishing becomes difficult with a normal 13ft or 14ft rod, although you can buy rods up to 18ft long for this.
What does ‘mending’ the line mean when float fishing?
With the line coming off the top of the float, your mainline above the float sits on the water’s surface. You need the line to do this so that you can instantly pick it up off the surface on the strike to connect with bites effectively – hence the need for a floating mainline when stick float fishing. To help keep the mainline sitting in the surface film, especially in rough conditions, add a little line floatant to the line above the float on a regular basis. However, the pace of the river and any downstream wind will tend to push this line in front (downstream) of the float. If this happens the float will be pulled through the swim faster than the current, ruining presentation. The process of ‘mending’ the line is the regular need to lift the line off the water and place it behind the float, all the time keeping in contact with it as it moves downstream. It’s done with an exaggerated high lift and lowering of the rod tip. You can also hold the rod high so that you are in direct contact with the float at all times, but this is only possible when fishing shorter trots.
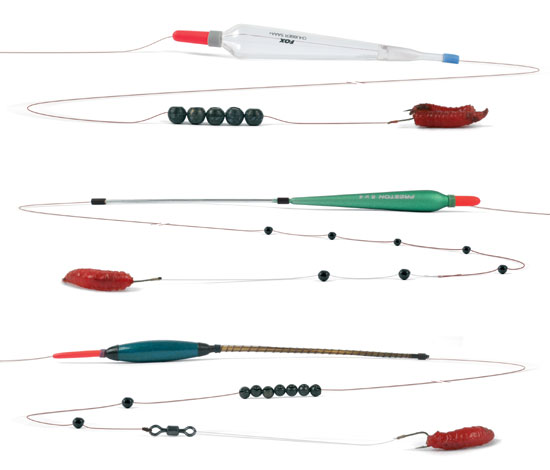
Shotting patterns for stick float fishing
Three standard shotting patterns are shown in this guide. As a rule of thumb, the shirt button style is good when fish are likely to be active and darting through the water layers to intercept bait, as it gives a slow, even fall of the hook bait through the water. In very cold weather river fish can often stay tight to the bottom, and in those conditions bulking the shot about two thirds of the way down the line with three of four dropper shot below will be more effective. Another time when a bulk is needed is when the upper layers of water are teeming with small fish like bleak and you need a lot of weight to get the bait through these to the bigger fish below. In these conditions you might need to push the bulk quite close to the hook with only one or even no dropper shot below. For big fish rigs when fishing baits like bread for roach and chub, it’s standard practice to bulk the shot together with a couple of droppers.
Feeding your swim?
This is all based around loosefeed, although some anglers kick start the swim with a couple of bait droppers to get food on the bottom where they hope to catch. The aim with your loosefeed is to keep the fish interested while at the same time creating quite a tight area where you are getting most of your bites. If you feed too much you might fill the fish up, or get the fish chasing bait downstream and away from you. Too little and the fish will lose interest or move off to the angler upstream of you who is feeding more. Your main loosefeeds are maggots, casters and hemp. Remember that hemp sinks more quickly, so this needs to be fed downstream of the maggots and casters if it’s to reach the bottom in about the same area. Your rule of thumb is to keep a steady trickle of bait going through the swim each run through. How much depends on how well the swim is fishing – if it’s difficult half a dozen maggots a cast will be enough – if you need to hold loads of fish in the swim you’ll need to feed a lot more. Note that roach have a tendency to hang just beyond where you are feeding, so every so often try that little bit further out. Big roach also tend to hang at the end of the run, behind the smaller fish.
Have stick floats got any uses on stillwaters?
Normal patterns of stick floats are of no use on stillwaters, but there are specialised uses for floats that are attached top and bottom fashion. A chubber style of float is the ideal floatfishing tool when fishing small livebaits for quality perch.
What is stret pegging?
This is a running water method in which you use a top and bottom float to present a static bait to the fish. It looks cumbersome but in the right hands can be deadly for the likes of chub, barbel, bream and even big roach. Stret pegging is particularly good in deepish runs when you are fishing close to the near bank as the rod tip needs to be in line with the float and bait. The key is to place a bulk of shot (enough to sink the float) very close to the hook (around 8-12 inches) and set the rig well overdepth (at least two feet, more in faster swims). The idea is that this shot lies on the bottom with the float lying flat on the surface (pay out line until it does so). Cast downstream of you, and put the rod in two rests with the tip angled upwards so that the line is held off the surface. Putting a bow into the line also helps the shot hold, allowing the use of lighter, more sensitive floats. You can search the swim by lifting and lowering the rig to move it to a new position, and a 13ft or 14ft rod certainly helps in this. Bites tend to be very positive, with the float shooting across the surface and under.
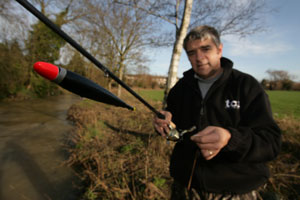
Is it important to plumb up when fishing the stick?
Yes and no. On fast-flowing rivers where you expect to be using a chunky float like a Loafer or Avon, it’s not that easy to find the depth, unless you use a very heavy plummet, and even then if the pace is powerful the weight can still get dragged along. Even if the plummet does hold station on the riverbed, the fast flow of the water will soon drag the float to the side under. However, all is not doom and gloom, as you can get a rough idea of the depth by gauging how quickly the float is dragged under. If it disappears immediately, you’re too shallow. But if it moves downstream before dipping, you can be certain that the rig needs to be shortened. Having found the extremes you can take off the plummet and once you start fishing you can tweak it as you go. Just keep moving the float up the line to add a bit of depth at a time until the float drags under as it moves downstream, then when it does take a little bit back off and that should see you running your bait right through the swim just off bottom. Then if it goes under, it’s a bite! On slow-flowing rivers it is important to be as accurate as possible. Presentation is important, as the fish have more time to see a bait. If it does not natural as it travels along in the flow, the fish are more likely to spook away from the bait. Even in a slow flow it’s better to use a heavy plummet so that it sits stationary on the deck. This will enable you to set your float so that just the tip is visible as the plummet hits the bottom. Once you have found the correct depth you can then make a few casts downstream on the same line to see how uneven the path of the trot is, and make slight changes so that the bait travels the glide unhindered. A heavy plummet will totally unbalance a rig, so you need to be especially careful when plumbing up over a distance of more that two rodlengths, or you will encounter tangles on the cast and more than likely trash your rig. The safest way to cast in a similar way to that shown on this page, but you will need to raise the rod higher to allow for the extra bend in its tip due to the weight of the plummet.
tTop Tip
One major bonus of having the float attached top and bottom rather than at the bottom only (as with a waggler) is that the process of plumbing up the depth of the swim is very easy, quick and positive. Once you have your depth, place a No8 shot directly under the float to mark it.
Top Tip
Downstream winds can push the mainline ahead of the float, causing it to be pushed downstream too fast and ruining presentation. Placing a No8 back shot about eight inches above the float sinks the line behind the float and solves goes a long way towards solving this problem.
Fishing Shot Conversion Table 1
1xSSG = 2xAAA
1xAAA = 2xBB
1xBB = 2xNo4
1xNo1 = 3xNo6
1xNo4 = 2xNo6
Shot Conversion Table 2
1 SSG = 1.6g
1xAAA = 0.8g
1xBB = 0.4g
1xNo1 = 0.3g
1xNo4 = 0.2g
1xNo 6 = 0.1g
1xNo8 = 0.06g
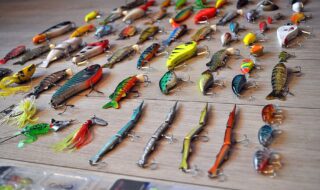
Types of Stick Float
Stuck with your stick float selection? The Total-Fishing team focuses in on the top eight most popular top and bottom patterns used by today’s river anglers.
THE ALLOY STICK FLOAT
With a balsa body and alloy stem, the alloy stick float is ideal when fishing lively water like that found at the tail of weir pools. It will remain stable because the heavy metal stem allows it to ride the surface boils yet stay upright and keep the bait close to the riverbed.
Shotting: Shirt button or bulk
THE STANDARD STICK FLOAT
With its traditional slim-line balsa body and a heavier cane or plastic stem, the standard stick float is perfect for fishing the crease formed where faster water meets slower on deepish, steady glides for roach and chub.
Shotting: Shirt button
THE BALSA
The short, slim balsa wood float has a heavier short insert normally made from cane or plastic to give it stability. The float is the one that you should select for fishing shallower stretches when targeting dace or small chub.
Shotting: Shirt button
THE LOAFER
A larger balsa stick pattern, the loafer is made from balsa wood with a short, brass stem or blown plastic with a hard plastic stem. The float is just the tool for fishing shallow, turbulent water with big baits like bread.
Shotting: Bulk
THE CROWQUILL AVON
With a body of balsa or polystyrene and a crowquill passed through the middle, the float was originally designed for fishing on the Bristol Avon by Merv ‘Topper’ Haskins to get bait down quickly in the deep water.
Shotting: Bulk
THE LIGNUM STICK FLOAT
This is primarily a standard stick with a heavy, hardwood stem for use in slower, deep (over 8ft) rivers where the bulk of the shot needs to be placed below half-depth to create a stable rig in windy conditions. Good when you need to fish at medium range too.
Shotting: Shirt button or bulk
THE QUILL
One of the earliest patterns of stick float, the quill is made from a stripped crow, peacock feather or a spine from the porcupine. Buoyant and extremely sensitive, the float is suitable for slow-moving venues.
Shotting: Shirt button
THE AVON
This pattern encompasses most wide-bodied floats with a long stem used on fast-flowing rivers and streams. The main body can be balsa, polystyrene or blown plastic and the stem hard plastic, wire or cane.
Shotting: Shirt button or bulk