 |
Step 1
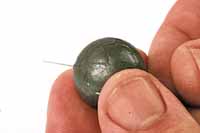
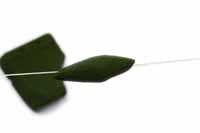
Thread your 12lb Pro-Gold main line through the back lead. Leads of up to two or three ounces are needed for heavy water conditions; if in doubt it is best to err on the large side. A back lead can never be too big, but is a positive disadvantage if too small. |
|
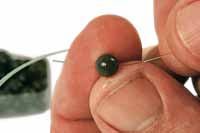 |
Step 2
Slide on a big, soft rubber bead, and lock it in place with a medium Drennan float stop. The stop must hold fast enough to retain the lead when casting yet be able to slide easily if it snags. With finer lines it may be necessary to use a small-sized stop, or use two stops together to hold the back lead. |
|
 |
Step 3
The back lead can now be adjusted, but moisten the line before sliding the stop. When fishing close in to the bank, the distance between lead and back lead needs to be only two or three feet. When fishing further out or trying to avoid drifting weed and debris, up to 10 feet between the leads can be used. |
|
 |
Step 4
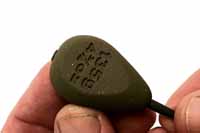
Another float stop may be added at this stage if a long lead-to-lead distance is anticipated. The stop can be used if necessary to help attach some tungsten putty to the line between the leads. |
|
 |
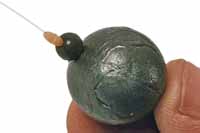
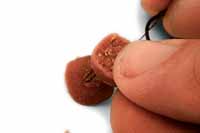
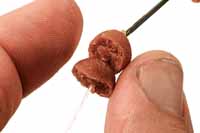
Step 5
A nice, big piece of putty can be squeezed around the stop, and adjusted to sit about eight inches or a foot from the main lead. Pinning the line to the bottom this way will avoid spooking the barbel and also prevent drifting debris from fouling the line. |
|
 |
Step 6
The heavier the flow the more putty or plasticine you’ll need; alternatively, use a tiny, drilled bullet or just a big swivel. It is important to cast smoothly and try to lay the tackle out in a straight line along the bottom. The big back lead will help here, and the leads should hit the bottom in two stages ideally. |
|
 |
Step 7
You must use a lead that’s both heavy enough to hold bottom and to prick the fish properly so allowing them to hook themselves and bolt off. It’s not unusual to use 4oz in the summer on the Hampshire Avon, for example, and even heavier leads in the stronger, weedy and debris-strewn flows of the winter. |
|
 |
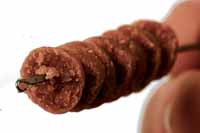
Step 8
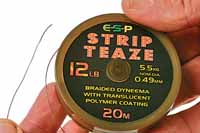
Prepare a four to six-inch length of Drennan Striptease – a tough, supple and reliable hook length material. There is a whole range of materials available now, but the coated braid enables a fairly tangle-free rig to be employed, and there is less chance of the hook link bunching or falling in a heap on top of the lead. |
|
 |
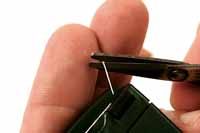
Step 9
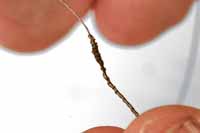
About four inches of coating needs to be removed, either with a fingernail or the back of the blade of your scissors. |
|
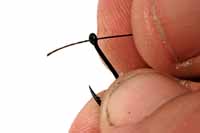 |
Step 10
The stripped end can now be threaded through the eye of the hook in readiness to tie a knotless knot. |
|
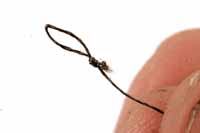 |
Step 11
At this stage, a simple overhand loop should be tied in this end of the braid. A hook bait can be attached using a boilie stop or preferably glued on as will be seen in the next few steps. |
|
 |
Step 12
Ensuring you leave a longish hair of about an inch, you can now secure the cleaned braid to the hook with a standard knotless knot. |
|
 |
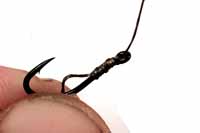
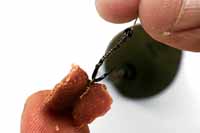
Step 13
The other end of the hook link can now be tied to a size 10 ESP swivel. The braid should be left unstripped, threaded through the eye of the swivel twice, and a five-turn grinner knot tied for absolute security. |
|
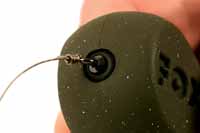 |
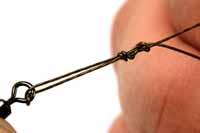
Step 14
The hook link can now be tied, using a five-turn tucked blood knot, to the main line and pushed snugly into the lead rubber. |
|
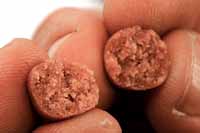 |
Step 15
With good quality boilies it is possible to squeeze them gently and break them in half. These broken bits can be Superglued together in all sorts of ways to produce a small, attractive hook bait that will not raise the suspicions of the barbel. |
|
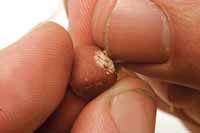 |
Step 16
It is best to gently roughen up the smooth surface of the boilie to provide a good key for the glue. A slightly dampened boilie will stick better than a dry one. |
|
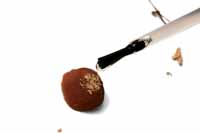 |
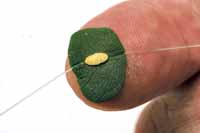
Step 17
Glue applied with the brush applicator is always best for this next step, and you should aim to place a single drop of glue onto the surface of the bait while not actually touching it. This avoids contamination of the glue which can ruin the whole bottle. |
|
 |
Step 18
The loop on the hair below the hook can now be placed carefully on the spot of glue with the other half of the boilie gently placed on top of that. |
|
 |
Step 19
The bits of boilie will become stuck together within seconds and can be trimmed to make the bait even smaller; if necessary, extra bits of boilie can be added. A Superglued bait is much more resistant to the attentions of chub or small silver fish, which can soon batter a conventionally attached boilie off the hair. |
|
 |
Step 20
The loose offerings for the stringer can now be prepared. Bits of boilie can be threaded on to a long baiting needle. Small pieces of paste can also be added to the PVA string later. |
|
 |
Step 21
About 12 inches of three-ply ESP PVA string can now be cut to make the stringer. PVA tape can also be used, but the three-ply dissolves very quickly, even in cold water. |
|
 |
Step 22
The length of string is doubled up and the bits of boilie gently threaded on to the needle. Latched needles are much safer and more efficient than the old-fashioned barbed variety. |
|
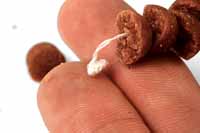 |
Step 23
Now I moisten the loose ends of the string and roll it between finger and thumb until it makes a little ball of PVA, which will retain the boilies on the stringer. |
|
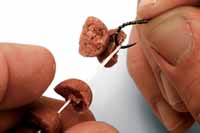 |
Step 24
The other end of the stringer can now be looped over the bend of the hook. It’s important to push the bait nearest the hook tight to the bend of the hook, but the other baits should be spread out evenly to ensure they are all released at the same time as the string dissolves. |
|
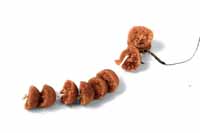 |
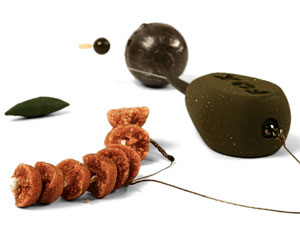
Step 25
The finished hook link should now deposit a few tasty broken boilies just downstream of an unusual hook bait, with a large surface area and plenty of attractive tastes and smells! |
|
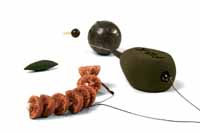 |
Step 26
The finished rig is ideal for presenting small hook baits to cagey barbel at fairly close range in cool water conditions. |
|