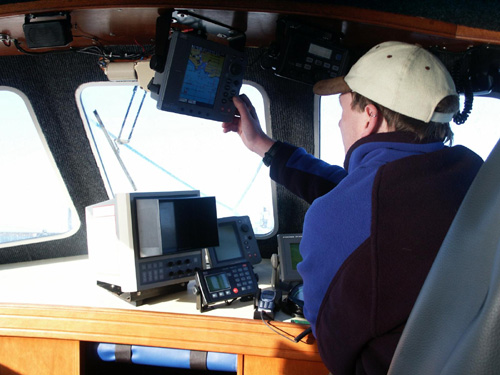
Jim O’Donnell, skipper of top Plymouth charter boat ‘Tiberon’, explains how to use a chart plotter to drift over marks with precision.
THE marine electronics industry moves so quickly with new and more accurate products, released on a regular basis, that it’s hard to keep up sometimes.
Ask any long-time charter skipper and they will recall the days when all their fishing was done using land marks. Then came the invention of Decca which made life easier, and enabled fishing at long range out of site of land to be done.
Now we have chart plotters, these superb and relatively cheap pieces of equipment have allowed every boat user to experience the accuracy which was only at one time available to commercial, charter, and private skippers that weren’t short of a shilling.
After reading this feature on how to drift using your plotter there will be no excuse not to hit the mark time after time, no actually it would be a crime not to do so.
In this articles I’m going to deal with drift fishing. It is probably one of the most deadly methods known to any skipper and nearly all the species which inhabit UK coastal and offshore waters can be caught using this method.
The Collin’s English dictionary describes drifting as the following: ‘Drift – To be carried as by current of air or water’. So that is what we are going to do, to use the chart plotter to set up a drift where wind and tide will drive us over the bottom feature we have plotted.
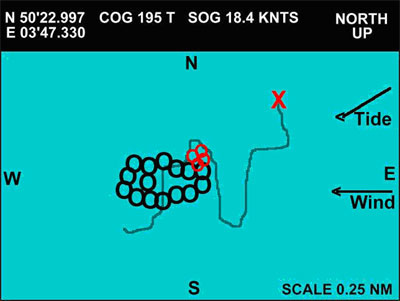
Key to graphics
+ = Cursor
O = Event/Mark icon
X = Vessel![]() = Vessels track over the sea bed
= Vessels track over the sea bed
o = Fish location mark
 |
Step 1
First pick the mark you wish to fish {for the purpose of this exercise we will pretend we are drifting a rock pinnacle for pollack}. Steam to the mark, when you get there turn on the fish finder and switch it to the 200KHz frequency, which is used to pinpoint exactly what is under the boat. Work over the rock at slow speed from all points of the compass, watching the fish finder for signs of any life below. When any traces of fish or bait show on the sounder, push the mark/event button. Now you can see exactly where the fish are in relation to feature itself.
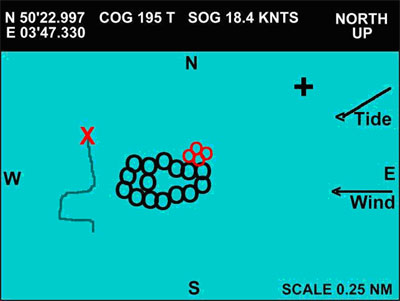 |
Step 2
Right we’ve found the feature, and we’ve found the fish {on this diagram they are represented by red circles}, now it’s time to get down to business. But first we need to look at the wind and tide conditions before we start. When wind and tide oppose each other, drifting is difficult as the boat will not go where you want it to, but for this exercise we have the easy option, both wind and tide are from the same direction, the east. That means our drift will start in the east and the wind/tide conditions will drive us back towards the west and over our target. The next step involves guess work as different hull shapes will drift in different directions to others. Imagine the direction you think the boat will drift, then turn this direction into an imaginary line which intersects our fish mark. The down tide end of this line will be the boa’ts end position after the drift. On the other end of the line, the up tide end will be our start position. Arm the unit’s cursor and place it on the imaginary start position, then drive the boat to this position and start the drift.
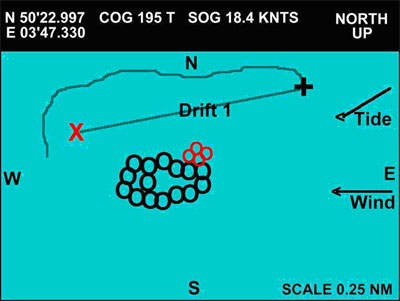 |
Step 3
Whoops we missed. But not to worry as our first drift has now left us with an accurate template to use for our second attempt. The line which runs from the cursor to the boat’s end position is the course the boat drifts under these conditions.
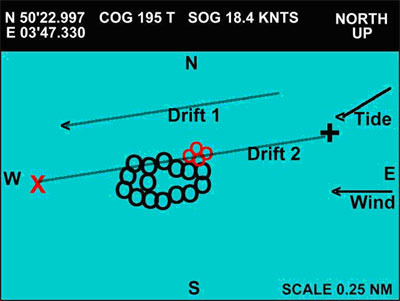 |
Step 4
Here comes the simple part. We now know the line of drift one to be our accurate course, so instead of having to guess the next move we can use drift ones course as a template to set up the next drift by imagining a second line. Keep this line parallel to the line of drift one and move it up or down until it intersects our fish marks. As with the last drift, the end position is down tide and the start position is on the up tide end of our line. Place the cursor on the up tide end of the imaginary line and proceed to set up another drift. As you can see this time we were bang on target. This drift can be repeated with accuracy every time by taking the boat back to the cursor start position.
A word of warning though. Be careful to watch you don’t knock the cursor button or the whole process will have to be followed again.
Tip time now. Iinstead of trying to imagine lines all the time, carry a ruler or another item with a straight edge and use this by placing it against the screen to create a line that is visual. A clear ruler or Perspex works best.
Debrief
Congratulations. You now know how to drift with deadly accuracy, but don’t think it’s all going to be plain sailing. You will have to learn how to set up a drift in all sorts of wind and tide conditions and then the next thing to look at is are your lines passing through the target? The boat may pass over the target beautifully, but if the lines are at an angle and away from the boat, you might still need to alter the drift slightly to compensate.
Jim O’Donnell, ‘Tiberon’, Plymouth, Tel 07855 040015; Email: skipperjim@blueyonder.co.uk
![]()